My birthday was on the end of July, and usually where I work, we always take a cake for the colleagues when there is this type of celebration. Happens that in my working place I have a lot of colleagues which demanded for at least 2 huge cakes.
Here is one of them, a very fresh cake good for the summer (or for the lucky ones who happen to have summer where they live, because here it´s something virtual).
The recipe was adapted from Dr. Oetker.
Coconut and mandarine cake
Bottom cake dough
60 g butter
75 g of sugar (I used brown sugar)
1 teaspoon of vanilla extract (I used homemade one)
2 eggs
100 g cake flour
1 tablespoon of backing powder
25 g of maizena
Cream mixture
150 g of pealed and skinned mandarine pieces (can be canned also)
250 g of creme fraiche
1 teaspoon of vanilla extract
50 g of maizena
80 g of sugar
(in the recipe it asked for a package powder for vanilla pudding, I opted to use the maizena and vanilla extract)
Coconut topping
100 g of grated coconut
50 g of sugar
1 teaspoon of vanilla extract
1 egg
1 tablespoon of milk
Preparation
Start by pre-heating the oven to 180°C and put some butter and flour in the springform.
For the bottom cake dough, mix the butter with the sugar until creamy. Add the eggs one by one mixing each egg before adding the next one. Slowly add the flour, maizena, backing powder and vanilla extract mixing it well. Place the dough in the backing form and bake for 12 to 15 minutes. After this time take it from the oven and let it cool slightly while you prepare the cream mixture.
For the cream mixture, mix the creme fraiche with the vanilla extract, sugar and maizena until well mixed. Distribute the mandarine pieces on the top of the previously baked cake dough and then add the creme fraiche mixture on the top. Bake again for 15 minutes.
Meanwhile prepare the coconut topping by mixing all the ingredients together. Spread it trough the top the baked cream cake and bake it one last time for 20 minutes, until the coconut topping is slightly brown.
Let it cool down completely and release from the springform.
Enjoy!
Saturday, 13 August 2011
Saturday, 2 July 2011
Making your own wild yeast starter
Since I moved to my actual apartment (meaning, since I have a decent oven), I started baking bread regularly. Usually once a week, on the weekends when i have a bit more time. I always loved bread, but since I came to Germany I think I started appreciating all the different types of grains and flours they use so much here. In Portugal I have the feeling the white and rye bread are the staples, not varying much from there.
Anyways, since I started learning a bit more about making bread, I become curious about the different ways to bring more taste to it. I personally love rustic breads, specially with rye, and for me the normal bakers yeast was not working. So I read about the wonders of "cultivating" your own yeast, by making a starter, and the wonderful flavor that it brings to the bread. Basically what you do is just add some flour and water, leave it at room temperature renewing the ingredients every day, until you start seeing some "bubbling", meaning that your culture became active and you managed to trap the wild yeasts that are present in the flour.
In a wild yeast culture there is actually not only yeast but also bacteria. The bacteria metabolize sugars converting them to lactic acid or acetic acid, which brings up the sour flavor common in sourdough breads. The yeast produces carbon dioxide and alcohol which will help raise the bread, making it fluffy. The resulting flavor that the starter brings depends greatly on the different species of bacteria present, and that differs from place to place, with clima, etc. So my starter might have a very different taste from the one of someone else.
There are many different ways of making a starter (check the links in the end of the post). I based myself slightly in Peter Reinhart´s suggestions, but I prefer to make a 100% hydration starter, which means that I always feed it with it´s own weight in flour and water.
How I did it, in simple steps:
Day 1 - weight 100 gr of rye flour and 100 gr of water, mixed them well and place in a glass container covered but not tighten (to allow the excess gases to come out). Leave at room temperature for 24h.
Day 2 - Weight half of the previous mixture (should be 50 gr) and add the same weight of rye flour and water, mix and leave again until the next day.
Day 3 and so on - Repeat the same procedure, until you start seeing some bubbling in your culture, around 2 to 4 hours after "feeding it".
From now on you can either repeat everyday the same procedure (you can also increase the amount of flour and water so you have a bigger volume of starter to use) and leave it at room temperature, or you can place the culture in the fridge and reduce the feeding for once a week (less work, for the lazy people). Usually the longer you leave it in the fridge without feeding the more sour the taste will become, so you can play around with it to achieve your favorite flavors. Also you can use different flours to begin with starter. I personally found that with rye it was easier.
By the way, my starter´s name is Schrödinger. I never know if he is dead or alive until I "open the box".
And then finally you can bake you first sourdough bread. The easiest recipe for bread with starter is using the 1:2:3 ratio. 1 time starter, 2 times water and 3 times flour. In this case I chose a spelt flour bread.
Sourdough spelt bread:
100 gr of 100% hydration starter
200 gr of water
150 gr of bread flour
150 gr of whole grain spelt flour
5 gr of salt
10 gr of sugar or 1 tablespoon of honey
Mix the different flours with the salt and sugar (if using honey, add it to the water first). Mix the water with the starter and add to the flour mixture. Using a mixer, mix the ingredients until they are well blended. Let the dough rest 30 minutes, and then knead it until elastic (you might need to add a bit more flour to work around the dough). Let it raise until double the size, about 1 hour (depending on the strength of your starter might take more or less time). Shape the dough to your liking (I usually place it in a rectangular bread form) and let it raise again for about 30 minutes. Bake at 200°C for the first 20 minutes and then reduce to 170°C for another 20-30 minutes.
Enjoy!
For more information:
http://www.thefreshloaf.com/node/9346/123-easy-formula-sourdough-bread
http://chocolateandzucchini.com/archives/2009/07/natural_starter_bread.php
http://www.hefe-und-mehr.de/en/2010/12/sauerteig-ansetzen/
Anyways, since I started learning a bit more about making bread, I become curious about the different ways to bring more taste to it. I personally love rustic breads, specially with rye, and for me the normal bakers yeast was not working. So I read about the wonders of "cultivating" your own yeast, by making a starter, and the wonderful flavor that it brings to the bread. Basically what you do is just add some flour and water, leave it at room temperature renewing the ingredients every day, until you start seeing some "bubbling", meaning that your culture became active and you managed to trap the wild yeasts that are present in the flour.
In a wild yeast culture there is actually not only yeast but also bacteria. The bacteria metabolize sugars converting them to lactic acid or acetic acid, which brings up the sour flavor common in sourdough breads. The yeast produces carbon dioxide and alcohol which will help raise the bread, making it fluffy. The resulting flavor that the starter brings depends greatly on the different species of bacteria present, and that differs from place to place, with clima, etc. So my starter might have a very different taste from the one of someone else.
There are many different ways of making a starter (check the links in the end of the post). I based myself slightly in Peter Reinhart´s suggestions, but I prefer to make a 100% hydration starter, which means that I always feed it with it´s own weight in flour and water.
How I did it, in simple steps:
Day 1 - weight 100 gr of rye flour and 100 gr of water, mixed them well and place in a glass container covered but not tighten (to allow the excess gases to come out). Leave at room temperature for 24h.
Day 2 - Weight half of the previous mixture (should be 50 gr) and add the same weight of rye flour and water, mix and leave again until the next day.
Day 3 and so on - Repeat the same procedure, until you start seeing some bubbling in your culture, around 2 to 4 hours after "feeding it".
From now on you can either repeat everyday the same procedure (you can also increase the amount of flour and water so you have a bigger volume of starter to use) and leave it at room temperature, or you can place the culture in the fridge and reduce the feeding for once a week (less work, for the lazy people). Usually the longer you leave it in the fridge without feeding the more sour the taste will become, so you can play around with it to achieve your favorite flavors. Also you can use different flours to begin with starter. I personally found that with rye it was easier.
By the way, my starter´s name is Schrödinger. I never know if he is dead or alive until I "open the box".
And then finally you can bake you first sourdough bread. The easiest recipe for bread with starter is using the 1:2:3 ratio. 1 time starter, 2 times water and 3 times flour. In this case I chose a spelt flour bread.
Sourdough spelt bread:
100 gr of 100% hydration starter
200 gr of water
150 gr of bread flour
150 gr of whole grain spelt flour
5 gr of salt
10 gr of sugar or 1 tablespoon of honey
Mix the different flours with the salt and sugar (if using honey, add it to the water first). Mix the water with the starter and add to the flour mixture. Using a mixer, mix the ingredients until they are well blended. Let the dough rest 30 minutes, and then knead it until elastic (you might need to add a bit more flour to work around the dough). Let it raise until double the size, about 1 hour (depending on the strength of your starter might take more or less time). Shape the dough to your liking (I usually place it in a rectangular bread form) and let it raise again for about 30 minutes. Bake at 200°C for the first 20 minutes and then reduce to 170°C for another 20-30 minutes.
Enjoy!
For more information:
http://www.thefreshloaf.com/node/9346/123-easy-formula-sourdough-bread
http://chocolateandzucchini.com/archives/2009/07/natural_starter_bread.php
http://www.hefe-und-mehr.de/en/2010/12/sauerteig-ansetzen/
Thursday, 7 April 2011
Sprouting
For sure everyone already ate soya sprouts at least in a chinese restaurant. Actually you can sprout virtually any seed (some might be more or less suitable for eating of course) and it´s a fast and easy way of having some sort of fresh "vegetable" at the table. Besides if you like growing things, and also if you have kids at home I think this is quite an interesting little "project".
You can use the resulting sprouts in many different dishes. Either raw in salads to give it a bit of crunch, in soups, or as a side dish sautéed like I suggest below.
You don´t need much for sprouting. First gather some seeds. In natural foods stores you can find for sale a huge assortment of seeds or also pre-made mixtures specially for sprouting. Then you can use a normal glass jar and just cover it with some muslin, so that you can wash the seeds/sprouts and drain the water easily.
You can find a lot of information in the web about it, as well as different methods, containers, types of seeds and so on. You can check here, here and here for more detailed information and set up.
In this case I am using a mixture of fenugreek, green linseeds and radish. They make a nice combination of sweet and spicy. Usually 1 tablespoon of seeds results in 4 tablespoons of sprouts, of course it always depends on the kind of seed you are using and for how long you let them grow. I left the seeds soaking in water overnight (8 to 12h is ok), then you just have to wash/rinse them everyday with water (I do it twice a day, morning and evening for example), place the jar upside down to drain the water and in about 3 to 4 days you get sprouts like this ones:
I like to let them grow until I get the first small leaves, but you can do it for less or more time according to your taste (some do taste slightly different in different growth stages).
After you "harvest" the sprouts you can keep them in the fridge for some days until use.
In this case I used them to make a nice side dish (main dish for me actually) of brown and wild rice:
Brown and wild rice with sprouts and ginger
Ingredients
1 cup of brown/wild rice mixture
1 cup of fresh mixed sprouts
1 garlic clove, minced
fresh grated ginger to taste (I used 2 teaspoons)
2 tablespoons of butter
salt, pepper
soya sauce to taste
Cook the brown rice in enough water with salt (depending on the type of rice it can take more or less time), and drain after cooking.
Brown the garlic and the ginger in the butter. When slightly golden add the sprouts. Mixed them for a couple of minutes until soften. Add the rice and let fry slightly. Season with salt, pepper and soya sauce to taste.
You can use the resulting sprouts in many different dishes. Either raw in salads to give it a bit of crunch, in soups, or as a side dish sautéed like I suggest below.
You don´t need much for sprouting. First gather some seeds. In natural foods stores you can find for sale a huge assortment of seeds or also pre-made mixtures specially for sprouting. Then you can use a normal glass jar and just cover it with some muslin, so that you can wash the seeds/sprouts and drain the water easily.
You can find a lot of information in the web about it, as well as different methods, containers, types of seeds and so on. You can check here, here and here for more detailed information and set up.
In this case I am using a mixture of fenugreek, green linseeds and radish. They make a nice combination of sweet and spicy. Usually 1 tablespoon of seeds results in 4 tablespoons of sprouts, of course it always depends on the kind of seed you are using and for how long you let them grow. I left the seeds soaking in water overnight (8 to 12h is ok), then you just have to wash/rinse them everyday with water (I do it twice a day, morning and evening for example), place the jar upside down to drain the water and in about 3 to 4 days you get sprouts like this ones:
I like to let them grow until I get the first small leaves, but you can do it for less or more time according to your taste (some do taste slightly different in different growth stages).
After you "harvest" the sprouts you can keep them in the fridge for some days until use.
In this case I used them to make a nice side dish (main dish for me actually) of brown and wild rice:
Brown and wild rice with sprouts and ginger
Ingredients
1 cup of brown/wild rice mixture
1 cup of fresh mixed sprouts
1 garlic clove, minced
fresh grated ginger to taste (I used 2 teaspoons)
2 tablespoons of butter
salt, pepper
soya sauce to taste
Cook the brown rice in enough water with salt (depending on the type of rice it can take more or less time), and drain after cooking.
Brown the garlic and the ginger in the butter. When slightly golden add the sprouts. Mixed them for a couple of minutes until soften. Add the rice and let fry slightly. Season with salt, pepper and soya sauce to taste.
Thursday, 3 March 2011
Blueberry and orange cake
There is a cake recipe that never fails, the yoghurt cake. I think, at least in Portugal, everyone knows this recipe because most likely it was the first cake you baked, being so easy only having to mix up everything and bake.
The trick is to use the yoghurt container as the measuring cup for the other ingredients, so you really don´t need a lot of kitchen supplies for this, and the equation is quite simple: 1x yoghurt, 2x times sugar, 3x flour, 1x oil (or other fat). The original recipe asks for 3x sugar, but for me that is way too much! So usually I use either 2x or even less 1,5x like in this case. Also I tend to reduce a bit on the oil... By know you must have noticed I cannot sick to a recipe.... yeah I´m like that.
I do a lot of variations on the basic recipe, either by using different types of yoghurt, by adding fruits, or just some flavoring like vanilla or lemon zest.
Here I used some nice big blueberries with some orange juice/zest, which proved to be a really nice combination!
Blueberry and orange cake
Ingredients
(use the yoghurt cup as the measuring cup)
4 eggs
1 plain yoghurt (good quality, with no sugar or flavors added)
1 and 1/2 measuring cups of sugar
3 measuring cups of flour
1 1/2 teaspoons of baking powder
1/2 a measuring cup of oil or butter
zest of one orange
juice of 1 orange
1 tablespoon of triple sec (or other orange liqueur)
blueberries to taste (I used more or less 1 measuring cup)
Beat the eggs with the sugar until you get a creamy mixture. Add the flour (with the baking powder mixed in) and the yoghurt mixing well between each addition. Mix in the lemon zest, juice and triple sec and incorporate well. Add the blueberries mixing carefully. Bake at 180°C for 40 minutes (might take less might take more depending on the baking form and the oven).
Easy!
The trick is to use the yoghurt container as the measuring cup for the other ingredients, so you really don´t need a lot of kitchen supplies for this, and the equation is quite simple: 1x yoghurt, 2x times sugar, 3x flour, 1x oil (or other fat). The original recipe asks for 3x sugar, but for me that is way too much! So usually I use either 2x or even less 1,5x like in this case. Also I tend to reduce a bit on the oil... By know you must have noticed I cannot sick to a recipe.... yeah I´m like that.
I do a lot of variations on the basic recipe, either by using different types of yoghurt, by adding fruits, or just some flavoring like vanilla or lemon zest.
Here I used some nice big blueberries with some orange juice/zest, which proved to be a really nice combination!
Blueberry and orange cake
Ingredients
(use the yoghurt cup as the measuring cup)
4 eggs
1 plain yoghurt (good quality, with no sugar or flavors added)
1 and 1/2 measuring cups of sugar
3 measuring cups of flour
1 1/2 teaspoons of baking powder
1/2 a measuring cup of oil or butter
zest of one orange
juice of 1 orange
1 tablespoon of triple sec (or other orange liqueur)
blueberries to taste (I used more or less 1 measuring cup)
Beat the eggs with the sugar until you get a creamy mixture. Add the flour (with the baking powder mixed in) and the yoghurt mixing well between each addition. Mix in the lemon zest, juice and triple sec and incorporate well. Add the blueberries mixing carefully. Bake at 180°C for 40 minutes (might take less might take more depending on the baking form and the oven).
Easy!
Sunday, 27 February 2011
Daring Bakers Feb. 2011 - Panna Cotta with florentine cookies
The February 2011 Daring Bakers’ challenge was hosted by Mallory from A Sofa in the Kitchen. She chose to challenge everyone to make Panna Cotta from a Giada De Laurentiis recipe and Nestle Florentine Cookies.
I chose to make a vanilla panna cotta with layers of apple and banana puree, wish I did just by pureeing the fruits with a bit of honey and adding a bit of gelatin to be more consistent as suggested in the recipe. The layers in my panna cotta didn´t come out perfect, but it was delicious.
i was checking the other peoples pictures in the Daring Kitchen forums, and almost everyone turned out with giant florentine cookies. Mine actually came out in a decent size. I just decorated them with dark chocolate instead of making the cookie sandwiches.
You can check out the base recipes here.
I chose to make a vanilla panna cotta with layers of apple and banana puree, wish I did just by pureeing the fruits with a bit of honey and adding a bit of gelatin to be more consistent as suggested in the recipe. The layers in my panna cotta didn´t come out perfect, but it was delicious.
i was checking the other peoples pictures in the Daring Kitchen forums, and almost everyone turned out with giant florentine cookies. Mine actually came out in a decent size. I just decorated them with dark chocolate instead of making the cookie sandwiches.
You can check out the base recipes here.
Saturday, 12 February 2011
Homemade butter is pure physics
Milk is a wonderful, complex thing. It is basically an emulsion of proteins, lipids (fats), vitamins and some ions like calcium. And what is an emulsion? Well in short is a stable mixture of immiscible components, lets say like the water and the fat in the milk. We all know that water and fat don´t like mixing (just pour some olive oil in water), so what´s the trick here? The fat in the milk is dispersed in small globules that are stabilized by phospholipids. Phospholipids are bipolar compounds that have hydrophilic (likes water) and hydrophobic (hates water) parts. So they can form little pockets to stabilize the fat in the water of the milk, hence forming the nice white emulsion in your caffe latte.
So to make butter you have to separate the butter from the milk (or cream), meaning, you have to break the small pockets holding the fat globules and let them aggregate and separate from the water part of the milk.
For that we have to use a bit of force...
In this case I used a high fat cream. Cream is easier to use than milk for making butter, because the cream is already a step ahead in separation of fat from the milk. So choose something with at least 35% fat.
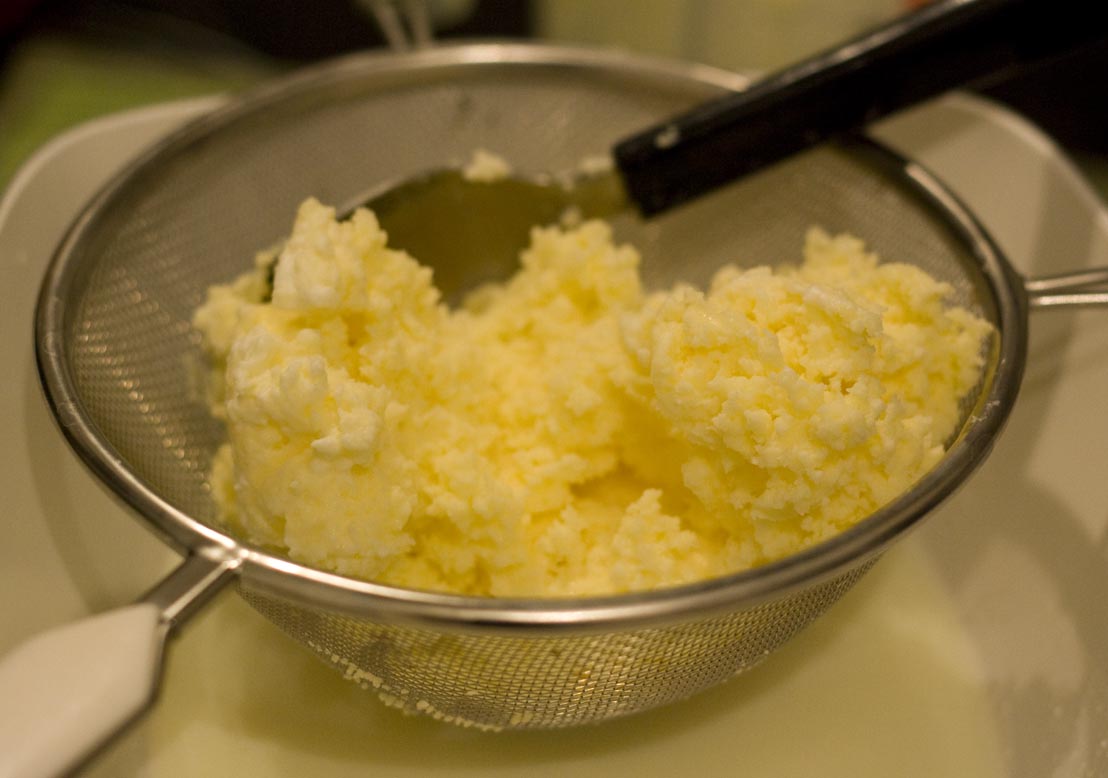
Then all you have to do is beat the cream like you would do for making whipping cream (but don´t add the sugar...). First you will see a nice whipped cream, then it will start curdling a bit and if you keep going you will see a separation of the fat aggregate and a white turbid solution.
This watery solution is buttermilk. Save it and use it to do, for example, a nice soda bread.
Now all you have to do is wash the butter with cold water (but discard this washing water), until the washing water comes out more or less clean.
You can also season the butter with salt, or even some herbs. In this example I used around 400 ml of 35% fresh cream, and in the end I got 200 ml of buttermilk and around 150 gr of butter. Half of it I just seasoned with a bit of salt, and the other half i added a mixture of herbs, pepper and salt.
With the buttermilk I am doing some nice muffins.... you´ll see them later.
So to make butter you have to separate the butter from the milk (or cream), meaning, you have to break the small pockets holding the fat globules and let them aggregate and separate from the water part of the milk.
For that we have to use a bit of force...
In this case I used a high fat cream. Cream is easier to use than milk for making butter, because the cream is already a step ahead in separation of fat from the milk. So choose something with at least 35% fat.
Then all you have to do is beat the cream like you would do for making whipping cream (but don´t add the sugar...). First you will see a nice whipped cream, then it will start curdling a bit and if you keep going you will see a separation of the fat aggregate and a white turbid solution.
This watery solution is buttermilk. Save it and use it to do, for example, a nice soda bread.
Now all you have to do is wash the butter with cold water (but discard this washing water), until the washing water comes out more or less clean.
You can also season the butter with salt, or even some herbs. In this example I used around 400 ml of 35% fresh cream, and in the end I got 200 ml of buttermilk and around 150 gr of butter. Half of it I just seasoned with a bit of salt, and the other half i added a mixture of herbs, pepper and salt.
With the buttermilk I am doing some nice muffins.... you´ll see them later.
Thursday, 3 February 2011
Arancini
When I was in Palermo some weeks ago, I tried this wonderful fennel and orange risotto that I didn´t rest until I tried to replicate it at home. It turned out really good, but I was not fast enough for taking pictures... so I will leave the recipe sometime later when I do it again.
Anyways, there were some leftovers. Honestly risotto is the type of thing that doesn´t taste the same reheated, at least to me. So I remembered of another typical Sicilian recipe which is the Arancini. These are fried risotto balls with either some cheese or meat inside. Here I show the simplest way of making them, which I got inspiration from in this nice book I bought while in Sicily.
Warning: close your eyes if you are on a diet...
Arancini with cheese
adapted from the book "Treasures of Sicilian cuisine"
Ingredients:
Leftovers of risotto (in this case around 4 tablespoons)
1 egg
breadcrumbs
cheese in little cubes (to taste)
oil to fry
Mix the risotto with the beaten egg. If you see that the mixture is too liquid add some breadcrumbs to thicken a bit. For each arancini use more or less 1 tablespoon of the mixture. Shape it into a ball and in the middle add 1 or 2 cubes of cheese. Round it up, and pass it through the breadcrumbs until it is well covered. Fry it in hot oil until golden.
Enjoy!
Anyways, there were some leftovers. Honestly risotto is the type of thing that doesn´t taste the same reheated, at least to me. So I remembered of another typical Sicilian recipe which is the Arancini. These are fried risotto balls with either some cheese or meat inside. Here I show the simplest way of making them, which I got inspiration from in this nice book I bought while in Sicily.
Warning: close your eyes if you are on a diet...
Arancini with cheese
adapted from the book "Treasures of Sicilian cuisine"
Ingredients:
Leftovers of risotto (in this case around 4 tablespoons)
1 egg
breadcrumbs
cheese in little cubes (to taste)
oil to fry
Mix the risotto with the beaten egg. If you see that the mixture is too liquid add some breadcrumbs to thicken a bit. For each arancini use more or less 1 tablespoon of the mixture. Shape it into a ball and in the middle add 1 or 2 cubes of cheese. Round it up, and pass it through the breadcrumbs until it is well covered. Fry it in hot oil until golden.
Enjoy!
Subscribe to:
Posts (Atom)